Eight steps
Every screenshot opens full size if you click it.
Buy a domain name
A domain is your address on the internet — the part after the @ in your email address. You are used to that being gmail.com or yahoo.com, owned by someone else. Getting it back is the reason Joinery exists. We recommend Namecheap, though any registrar works. Roughly $10–15 a year.
Once you own it, point it at the server you are about to create:
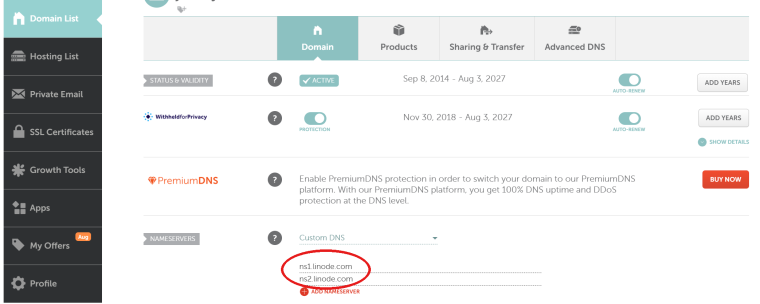
- In the Namecheap dashboard, click Manage beside your domain.
- Find the section marked Nameservers, choose Custom, and set the two entries to
ns1.linode.comandns2.linode.com. - Click the green checkmark.

Set up mail sending
Open a free account at SMTP2GO. The free plan sends 1,000 messages a month, and your mail still lives on your own server — only the last hop out to the world is borrowed.
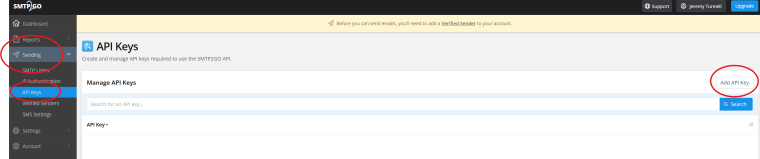
- In the left menu, open Sending and then API Keys.
- Click Add API Key and name it anything —
Joineryis fine. - Check its Permissions before saving. Turn on two groups: Emails and Sender Domains.
- Copy the key somewhere safe. You paste it into the deploy form in step 5, and your server sets email up for you while it installs.
Make a backup bucket
Open a free account at Backblaze B2 and sign in to the dashboard. The first 10 GB is free and anything beyond it is cheap.
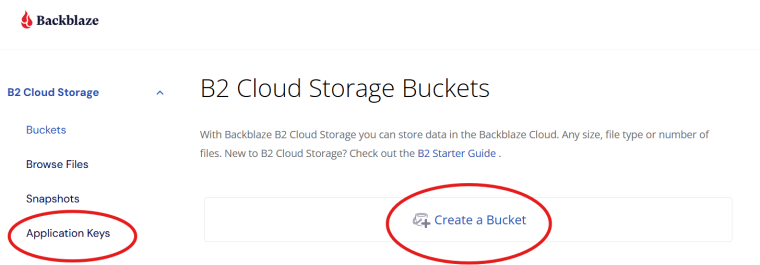
- Click Create a Bucket, name it
joinerybackups, and leave every other option at its default. - Back on the dashboard, click Application Keys in the left menu.
- Click Add a New Application Key and name it
backupkey. - Choose the bucket you just made from the dropdown, and set access to Read and Write.
- Click Create New Key and save both parts it shows you — the keyID and the applicationKey — along with the bucket name. All three go into the deploy form in step 5.
Open a Linode account and create a token
Sign up through our referral link and you get $100 of credit to spend over your first 60 days — more than enough to run your site free for two months. You will verify your email address and add a card. Once the Linode dashboard loads, you are ready.
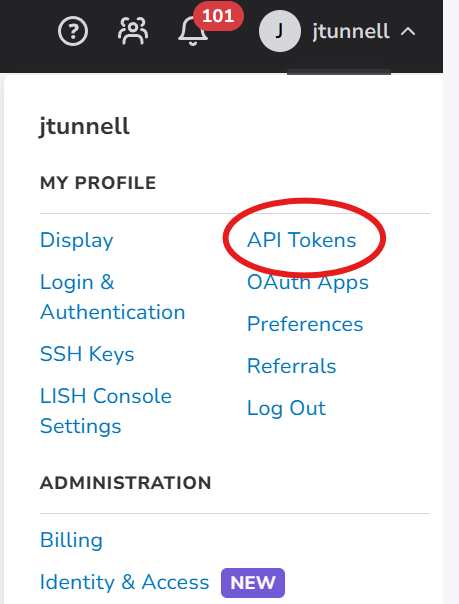
- Open the profile menu at the top right and choose API Tokens.
- Click Create a Personal Access Token and label it
Joinery Token. - Set the expiry to In one month.
- Set Domains and Linodes to Read/Write, and everything else to No Access.
- Click Create Token and save what it shows you. You paste it in step 5.
Create your server
This is the step that builds everything. Open the Joinery installer, click Deploy New Linode, and a form appears. Here is every field on it.
The Joinery fields, at the top
- Admin email address — the address you will log in with. Use the real one you read today, not the new one you are about to create: it is also how you recover the account if you forget your password.
- Admin password — your login password. Choose a strong one and save it; it is the password you keep.
- Your domain — the domain you bought, like
yourname.com. Exactly that: nowww, nohttps://. It has to be a domain you really own, because the installer connects it to this server. - Linode API token — paste the token from step 4. Your server uses it to add your domain to Linode’s DNS and point it at itself, and then to add the records your email needs.
- Email sending API key — paste the key from step 2. Your server works out which service issued it, sets email up while it installs — it picks an address on your domain from your admin email (for
[email protected]andyourname.comthat is[email protected], changeable later under Settings, Email), registers your domain at the service, and adds the DNS records. Leave it blank and the setup wizard asks for it instead. - Backblaze B2 bucket, key ID and key — the bucket name, keyID and applicationKey from step 3. Your server points its backups at the bucket and checks it can reach it. Leave them blank and the setup wizard asks for them instead.
The server fields, below
- Image — the operating system. Only the version Joinery supports is offered, so leave it alone.
- Region — where in the world the machine physically sits. Pick a city near you; any choice works.
- Linode Plan — the size. Click the Shared CPU tab and choose Nanode 1 GB at $5 a month. It is plenty to start with, and you can grow later without reinstalling.
- Linode Label — a nickname in your Linode dashboard.
joineryis fine. - Root Password — not your website login. This is the master password for the rented machine, which Linode requires you to set. Make it at least 12 characters, save it, and you will probably never need it again.
Click Create Linode. The machine boots and installs Joinery entirely on its own — web server, database, application, certificates, email and backups, all of it. Give it 5 to 10 minutes.
Log in
Ten minutes after you clicked Create, open a browser and go to your own site:
https://yourname.com/admin
Log in with the admin email and password you typed on the form in step 5 — not the root password.
Walk through the setup wizard
Your site opens its setup wizard the first time you log in. Each screen explains itself, so go through them in order. Do not skip the email screen: a password reset email is the way back into your account, and a brand new site cannot send one until mail is configured.
If you filled in the email sending key and the Backblaze bucket on the deploy form, the Email screen opens on a test message for you to confirm, and the Backups screen opens on the recovery key — both services are already set up. If you left either blank, the wizard asks for it here.
Open your new mailbox
Click your avatar at the top right and choose Dashboard, or go straight to yourname.com/profile. Then click Email in the submenu.
That is your mail, on your domain, on your server. You are done.